Tuesday, October 26, 2010

Pastel Christmas

If you've followed my blog, you'll know that once I get on a kick, it takes a while for me to get interested in something else. So it should come as no surprise that I'm sharing yet another non-traditional Christmas card :)
I used the Flourishes stamp set "All That Glitters" for the ornaments and Hero Arts "Holiday Sayings" for the sentiment. I used Memento Tuxedo Black ink for the stamping and I colored the images with Copic markers. I used some loose glitter for the "snow" on the ornaments and finished the card off with a row of buttons. Pretty simple design.
As you can see, I propped the ornaments up on foam dots for dimension. I stamped the image directly onto the card as well.

Thanks for taking a peek!

Saturday, October 23, 2010

Egg Pumpkin

I love pumpkins - big ones, little ones, fat ones and skinny ones. I own the Spellbinders Nested Pumpkin dies and I use them frequently for fall cards.
However, sometimes I want a different shape, and so I started experimenting. I made this fun pumpkin with the S4-264 Nested Eggs. How easy is that!? I like that you can layer different colors and patterns this way.
I sewed the three ovals together with tan thread up top and black bobbin thread. That way, it shows a bit of both. I used the Nested Maple Leaves for the sentiment (Papertrey Ink - Mega Mixed Messages stamp set). The orange patterned paper is by Jillibean soup (Soup Staples collection)- it's polka-dotted on one side and lined on the other. I used the Cuttlebug "Distressed Stripes" embossing folder on the center egg of the pumpkin.
For the black paper, I used a Martha Steward Deco Fan CORNER punch. If you fold in the corner flaps on the punch, you can use it to punch a straight edge. You line up the punches by looking through the back of the punch. The zig zag border was the other paper edge left behind by the corner punch. Becca Feeken has a great tutorial on how to do this if you want more information.
Thanks for taking a peek!

Friday, October 22, 2010

Fall & Winter

This has been a wonderful fall, but a quick look to the weather forecast for next week let me know that our glorious weather might be coming to an end. We have had fantastic fall foliage for this part of the US and the weather has been high 60's to mid 70's. Lovely. It's supposed to be a high of 50 next week, and while that's not horribly cold, it's not exactly nice either. *sigh*

I still have a few fall cards left in me, despite the weather. On this card, I used the new Spellbinders Lacey Squares and the limited edition Nested Pumpkins. I love pumpkins :) I crimped the larger pumpkin with an old Fiskars paper crimper and inked over it. On the smaller pumpkin, I stamped the sentiment (Papertrey Ink - Mega Mixed Messages) and outlined it with a glue pen. I sprinkled orange glitter on top to match the ribbon.
I used a Stampabilities music background stamp on the Lacey Square and inked over the edges as well.
Well, I guess I'd better get around and actually enjoy today. My class was cancelled for today and the kids are on fall break so maybe a trip to the park is in order.
Thanks for taking a peek!


Monday, October 18, 2010

Pink Greetings

Here is another card in the non-traditional Christmas category. It reminds me of the fun, colored trees in the Peanuts cartoon when Charlie Brown goes to find a tree. I stamped the tree in Memento Rose Bud ink and used a Zig glue pen and glitter to accent it. I adhered the pearl beads (not flat backed pearls, but round beads) with Glossy Accents - I wanted those buggers to stay put!

I used Spellbinders dies for the card and center shapes - Curved Rectangles and Labels Seventeen. This is a very simple card. It has detailed touches, but they're easy details that look deceptively hard. I finished this card in about five minutes from beginning to end.
In weather news, it's CHILLY! We're having a wonderful fall and I hope it sticks around. The trees are beautiful and I am enjoying not having to use air conditioning or the heat. I'm also on fall break from classes - it's only a four day weekend, but every little bit helps :)
Thanks for taking a peek!

Saturday, October 16, 2010

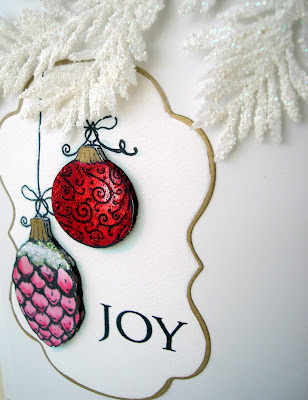
Christmas Ornaments

I love vintage style Christmas ornaments, especially this set from Flourishes - All That Glitters. Aren't those ornaments just beautifully detailed? It's so much fun coloring them in!

On this card, I used the lovely Spellbinders Labels Fourteen and I stamped the ornaments on top. I stamped separate ornaments on left over white cardstock so I could double layer them. I colored them pretty simply with Copic markers and glittered them with Stickles (Christmas Red) and some loose white glitter. I edged the label with a DecoColor Gold paint pen. The white sparkly branch is something I picked up at Hobby Lobby last season. I knew I wanted to stay with white, so it was perfect.
The "Joy" is from the Hero Arts clear set, Holiday Sayings and I stamped with Memento ink.
Thanks for taking a peek!

Thursday, October 14, 2010

Nontraditional Christmas Colors


I love the traditional colors and accents of Christmas. However, sometimes, change is good! On this card, I used a paper from the Winter Joy Collection from BoBunny. I love this collection - not only does it have beautiful colors, the patterns are also very nice.
As you can see, I'm still enjoying my new Spellbinders dies! I used the beautiful Lacey Circles on this card as well as last year's Limited Time Nested Christmas Trees set. I created the custom glittered paper myself before die cutting it with three different kinds of glitter. For the white part, I used a Martha Stewart Crafts Deco Fan border punch on both the top and bottom and then I embossed a line above each with my dry embossing stylus. The stamp was used with a Ranger Big and Juicy Rainbow Ink pad. I wanted to sort of mimic the way the colors melt together on the paper. The stamp is from a Clear Hero Arts set that I use constantly - Holiday Sayings.
Thanks for taking a peek, have a great weekend!

Tuesday, October 12, 2010

Pretty Peacock

When I was a kid, I lived on a farm. We had all sort of animals - including peacocks! My mom had a big vase full of peacock feathers she had gathered and some of the more mischievous kids (ok, me) would sneak up on the peacocks and snag a feather just for fun. I just loved the bright electric blue and green, they were SO PRETTY!

When my best friend, Dayna, was here a few weeks ago, we went to Hobby Lobby and I freaked out a little bit when I saw they had a set of Cuttlebug embossing folders with a peacock print! There was also a zebra, leopard and crock print in the set - very cool!

For this card:
1. I used a beautiful blue cardstock and embossed it.
2. Then I took Versamark ink and rubbed it over the embossing.
3. I brushed metallic green Perfect Pearls over the ink.
4. I embellished it with brown pearls for the "eye" of the feather.
5. I matted the blue onto metallic copper paper and then onto a green base. Before I adhered it to the green, I tied a ribbon around it.
6. Using a Spellbinders Label die, I cut the copper paper for the sentiment.
7. I used American Crafts Thickers (Dear Lizzy) for the "hi." The punched edge is from an EK Success punch


Thanks for taking a peacock...er...peek!!! ;)

Sunday, October 10, 2010

Warmest Wishes


Yeah, so I'm still on that winter card kick.
On this card, I used Cosmo Cricket paper. For the holly and berries, I just drew them freehand and colored them with Copics. I used Glossy Accents on the berries so they'd shine.
If you don't have a stamp, sometimes the easiest thing to do is just draw something. When the design is really simple, like with the holly and berries, it's easier than you might think!
Thanks for taking a peek :)


Wednesday, October 6, 2010

Fall

Fall is here! The weather has been so amazing, I am loving it. We don't tend to get a long fall here, sometimes it seems like it's hot right up until it snows! The last week and a half has been just great, and I hope it lasts!


The funny thing about all this fall business is that I just keep yearning to do winter cards! I look forward to snow and Christmas cards all year because they're my very favorite. So while I'm hoping that the fall weather sticks around, my creative mojo is making a snowman while listening to Christmas music.

This was made with Hero Arts stamps (clear and wood mounted). The snowman is part of a Build a Snowman set, and it is SO FUN! For the background, I used a wood mounted background stamp with Versamark ink. Then I brushed Perfect Pearls over the top - so in real life, the snowflakes are quite sparkly. To make the frame on the background paper, I simply used Copic markers and drew around it before machine stitching a straight edge.

Thanks for taking a peek :)

Saturday, October 2, 2010

Scrap 'n Art WCD Blog Train!

Welcome to the Scrap ‘n Art World Card Making Day Blog Train! If you haven’t been with us since the beginning of the train, make sure you go to Angela’s blog to board. Our train is headed on a fantastic holiday tour and you won’t want to miss any of the ten stops. We start out at Halloween, head on over to Thanksgiving and end our journey at Christmas. Each blog along the way has a word that you will need to write down. At the end of the line, post the sentence you gathered from the various blogs and you will be entered to win an amazing prize package!

The train ride will be open until midnight Sunday (US Central Time Zone) and the winner will be announced on the Scrap ‘n Art Blog on Monday, October 4.

This is the last of the Christmas part of the trip, and I have two cards for you. Both are pretty simple cards to make because the wide ribbon does most of the talking. I purchased this Ribbon Boutique ribbon in cream/gold and white/silver at Hobby Lobby.

On the first card, I used the Graphic45 Christmas Past collection (Deck the Halls and Ode to Joy). This collection is so beautiful and it has so many possibilities! I accented the image with Stickles and inked around all the papers with Ranger Distress Ink in Vintage Photo.

On the second card, I used damask paper from the Teresa Collins Chic Bebe Boy line. The doily is a simple baking doily from Martha steward Crafts. I love to use those on cards! The wreath and sentiment are from the Flourishes stamp set, Poinsettia and Boxwood. I accented the wreath with mini jingle bells that really do jingle! I attached them with Mini Adhesive Squares by Glue Arts. Thanks for taking a peek!

Welcome to the END of the line! Thank you so much for stopping by. My word for you is Girls! Compile the sentence from all the stops along the way and post it here on my blog. Thank you for sharing your journey with us!