Sunday, December 26, 2010

Winter Wonderland

Well, we didn't end up getting a white Christmas this year. We had a snow forecast for Thursday night, but nothing ever came of it. This morning, however, we woke up to this:

Not snow, but a beautiful coat of frost. Other places in town had even more, but I didn't have a chance to get other photos. I suppose this pretty frosted wonderland is enough to tide us over, but what we really want is some SNOW for Christmas break!
These two cards are from last season, but they're pretty appropriate. The stamp is an old wood handled rubber stamp I picked up at my dollar store when we lived in Tennessee. I believe the brand was Miss Elizabeth's. I colored the images a bit with Copics and accented with Diamond Dust and Martha Stewart Crafts Mica Flakes. All dies are Spellbinders of course :) I used Standard Circles, Scalloped Circles, Petite Snowflake Border and Create a Flake 2. Thanks for taking a peek!

Saturday, December 25, 2010

Merry Christmas!!!!


Merry Christmas, everyone!

Thursday, December 23, 2010

Poinsettias cont.

This is another one of my poinsettia paper cards in a more subtle style. I also used the boxwood wreath and bow from the Flourishes "Boxwood and Poinsettia" set. The sentiment is by Papertrey. I made red berries with dots of Stickles. The lace is a very old vintage that my mom picked up - I love vintage lace! I inked slightly around the edges of the red cardstock with Papertrey's "Fresh Snow" ink as well. The die cut is a Spellbinders Labels Sixteen.
Thanks for taking a peek!

Wednesday, December 22, 2010

Button, Button, Who's Got the Button?

I wanted to do a fun card to send to my sister in law and her kids. I had a large tree left over from the bunch of trees I die cut a while back (from glitter paper I made myself - the tutorial is in the current issue of Scrap 'n Art) and I knew it would be perfect. This is a very simple card - I cut the paper (Cosmo Cricket) and lightly distressed the edges with my scissors. Then I adhered the tree with Zip Dry and I also used the Zip Dry to adhere the buttons. As is the case with many glittered Thickers, they needed a bit more adhesive, so I applied a bit of the Zip Dry to them as well. On the inside, it says, "merry, merry, merry Christmas!"

Thanks for taking a peek!

Tuesday, December 21, 2010

Pretty Poinsettias

I think poinsettias are such a classy and beautiful flower. Last year I bought the "Boxwood & Poinsettias" stamp set from Flourishes and I have to say I'm getting my money's worth! I love making my own custom poinsettia paper and here are a couple different cards I've made this week.

For this card, I took medium pink cardstock and stamped large poinsettias and petals on the smooth side. I cut out one to use as an embellishment and then cut a piece to fit a 5x7 card. After I cut it, I used IOD Prima tape (it's old from my stash) to add the layer of text. I used Stampin' Up Real Red ink because it can be smeared a bit with moisture. I put some Diamond Stickles on the single poinsettia and smeared it with my finger to get the effect in the center. I finished the card off with a Hero Arts "Holiday Sayings" sentiment and Martha Stewart Crafts "Deco Fan" border punch.
This card was much more simple. I just took a plain white card base and stamped it with the large poinsettias. I glittered the centers and added the sentiment square that I die cut with Spellbinders Eyelet Squares. The ornament is a Spellbinders die from the Poinsettia Frameabilities set. The sentiment is by Papertrey Ink - Mega Mixed Messages.

On this last card, I did the same first couple steps as on the first. Then instead of adding the tape, I stamped text over it with Papertrey Ink's "Fresh Snow" ink and a Hot Off the Press text stamp. I smeared the centers with stickles and added the matted paper to the card base. I die cut a Spellbinders Labels Seventeen die in white and stamped with the Papertrey sentiment. The cute little gold tree is by Paper Dreams Factory - they are an AMAZING source of vintage embellishments!

In other news, we got a new cat! Our Humane Society was having a big adoption day on Saturday and the animals which had been there for a long time were really reduced. We picked up a 4-5 year old neutered male named Max. Our other cat is a 5 year old neutered male of the exact same size. We brought him home and he is just a lover! Such a cuddly guy and a big softie to boot. He so badly wants to be Ace's friend, but Ace is a little anxious.

Neither are aggressive though, so mostly they just follow each other around and stare. Ace had a moment of panic this morning and popped Max on top of the head with his dangerously furry paw and ran away. Max was unimpressed. Most of the time, they can be found standing on opposite sides of a door frame, peering at each other while Max does his purr-meow.

Other times, Max simply gives up and stalks Ace. When Ace gets near the stairs, he chases him up and I can hear him running into the wall at the top. Evidently his previous indoor experiences did not include wood floors.

Saturday, December 18, 2010

Warmest Wishes


We're getting our first snow of the season! It doesn't seem like we'll get a lot, but it's soft and fluffy and just beautiful as it's falling. I love the first snowfall - there's just something magical about it. I thought this card was appropriate for celebrating. I used the new Nested Mitten dies from Spellbinders and the new Snowflake Pendant die as well. I LOVE that large snowflake.
I used Papertrey Ink's "Mega Mixed Messages" for the sentiment. The pink strip of words is IOD Prima Marketing Tape. It's old - like 5 years old or so and I decided it needed to once again see the light of day. I used the Martha Stewart Crafts Deco Fan border punch for the punched edges and Martha Stewart Crafts Mica Flake Glitter for the mittens. The center bling is from my stash - I think it's by Hero Arts.
I also finished up my finals this week, so I'm free for a while! It's a great feeling :) Thanks for taking a peek!

Sunday, December 12, 2010

Super simple

I guess I'm going through a "simple" phase because this is another card that barely took 5 minutes to create. I did have the flower made ahead of time, but it could easily be made with a Prima or other ready-made flower. I used the Poinsettia Nested dies from Spellbinders to make the flower (Graphic 45 Christmas Past paper) and I glued pearl beads into the center. That was the hardest part of this one, the rest is easy peasy! I just stamped the sentiment (Holiday Sayings by Hero Arts) and glued sparkly pipe cleaners to the card base - I purchased mine in the Hobby Lobby craft supply dept.
Thanks for taking a peek!

Wednesday, December 8, 2010

Simple and Classy


I'm not so much of a simple papercrafter. I like techniques and all the extra "stuff" - that's what's fun to me. However, sometimes, I happen upon a card that just doesn't need a lot of extra. To me, this is one of those cards. I used the reindeer again from the Spellbinders Fanciful Holiday and it's layered onto a Spellbinders Labels Sixteen. The silver doily is by Martha Stewart. I used a dot of Stickles for Rudolph's nose and a small strip of Hobby Lobby ribbon for an accent :)
Thanks for taking a peek!

Sunday, December 5, 2010

Checking in

I'm still pretty busy with classes ending and finals coming up next week, but I wanted to peek in and share a card :)
I've been playing with my Spellbinders a lot this week. It's fun to be able to make up a lot of die cuts to use on cards even if I'm not sure how I'm going to use them. I think it lets me be a little bit more creative, because I make combinations I wouldn't normally think to do - like the one on this card.

I used the Poinsettia Frame die and some gold shiny cardstock. I love how the embossed portions look with the metallic paper! I'm also getting a lot of use out of the reindeer die from the new Fanciful Holiday die set. Of course I had to add a red pearl to his nose! Both of these are layered on a Labels Nine. The plaid paper is from Graphic 45 Christmas Past - LOVE that collection. The sentiment (Hero Arts) was heat embossed with copper detail powder from Stampendous!
Thanks for taking a peek!

Thursday, November 18, 2010

Rudolph


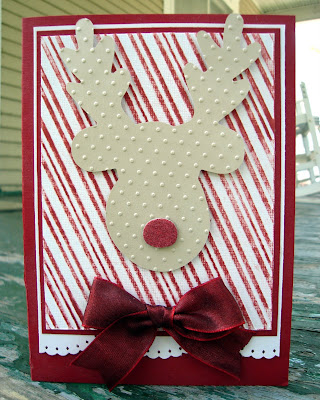
I didn't create this recently, but I realized I never shared it. I must have had this reindeer die cut for 8 years - it's pretty old. I decided it needed some Swiss Dots (Cuttlebug embossing folder) and a red glittery nose! For the background, I used the Candy Cane embossing folder and inked over it with Fired Brick Distress Ink. Such a simple card, but I think it's fun :) Thanks for taking a peek!

Saturday, November 13, 2010

Hiatus

Maybe you've noticed I've been gone. Right now is downtime for Scrap 'n Art, and usually I have mojo galore during this time. For some reason, I just don't have it at the moment and I'm not going to force myself. So I'm taking some time off, reading some blogs, checking out the new products.

I'll be back ;)

Wednesday, November 3, 2010

A beautiful fall

I had a little bit of Christmas anxiety this week when I realized that it was in fact, November already. I'm not ready! I'm just now getting into the beauty of fall and we are still having gorgeous weather here. I haven't had much creative time this week, but I do have some photos to share.

This is some of my fall decor. If you're wondering why that scarecrow is in a pickle jar...I don't know what to tell you. I just stuck it in there, tied some ribbon around the top and decided I like it!
This is close to our house. It was taken a week or so ago and now all the leaves are gone from this tree.


This is across the street. I really need to take another photo because they look completely different now. So pretty :)
Thanks for taking a peek!

Tuesday, October 26, 2010

Pastel Christmas

If you've followed my blog, you'll know that once I get on a kick, it takes a while for me to get interested in something else. So it should come as no surprise that I'm sharing yet another non-traditional Christmas card :)
I used the Flourishes stamp set "All That Glitters" for the ornaments and Hero Arts "Holiday Sayings" for the sentiment. I used Memento Tuxedo Black ink for the stamping and I colored the images with Copic markers. I used some loose glitter for the "snow" on the ornaments and finished the card off with a row of buttons. Pretty simple design.
As you can see, I propped the ornaments up on foam dots for dimension. I stamped the image directly onto the card as well.

Thanks for taking a peek!

Saturday, October 23, 2010

Egg Pumpkin

I love pumpkins - big ones, little ones, fat ones and skinny ones. I own the Spellbinders Nested Pumpkin dies and I use them frequently for fall cards.
However, sometimes I want a different shape, and so I started experimenting. I made this fun pumpkin with the S4-264 Nested Eggs. How easy is that!? I like that you can layer different colors and patterns this way.
I sewed the three ovals together with tan thread up top and black bobbin thread. That way, it shows a bit of both. I used the Nested Maple Leaves for the sentiment (Papertrey Ink - Mega Mixed Messages stamp set). The orange patterned paper is by Jillibean soup (Soup Staples collection)- it's polka-dotted on one side and lined on the other. I used the Cuttlebug "Distressed Stripes" embossing folder on the center egg of the pumpkin.
For the black paper, I used a Martha Steward Deco Fan CORNER punch. If you fold in the corner flaps on the punch, you can use it to punch a straight edge. You line up the punches by looking through the back of the punch. The zig zag border was the other paper edge left behind by the corner punch. Becca Feeken has a great tutorial on how to do this if you want more information.
Thanks for taking a peek!

Friday, October 22, 2010

Fall & Winter

This has been a wonderful fall, but a quick look to the weather forecast for next week let me know that our glorious weather might be coming to an end. We have had fantastic fall foliage for this part of the US and the weather has been high 60's to mid 70's. Lovely. It's supposed to be a high of 50 next week, and while that's not horribly cold, it's not exactly nice either. *sigh*

I still have a few fall cards left in me, despite the weather. On this card, I used the new Spellbinders Lacey Squares and the limited edition Nested Pumpkins. I love pumpkins :) I crimped the larger pumpkin with an old Fiskars paper crimper and inked over it. On the smaller pumpkin, I stamped the sentiment (Papertrey Ink - Mega Mixed Messages) and outlined it with a glue pen. I sprinkled orange glitter on top to match the ribbon.
I used a Stampabilities music background stamp on the Lacey Square and inked over the edges as well.
Well, I guess I'd better get around and actually enjoy today. My class was cancelled for today and the kids are on fall break so maybe a trip to the park is in order.
Thanks for taking a peek!


Monday, October 18, 2010

Pink Greetings

Here is another card in the non-traditional Christmas category. It reminds me of the fun, colored trees in the Peanuts cartoon when Charlie Brown goes to find a tree. I stamped the tree in Memento Rose Bud ink and used a Zig glue pen and glitter to accent it. I adhered the pearl beads (not flat backed pearls, but round beads) with Glossy Accents - I wanted those buggers to stay put!

I used Spellbinders dies for the card and center shapes - Curved Rectangles and Labels Seventeen. This is a very simple card. It has detailed touches, but they're easy details that look deceptively hard. I finished this card in about five minutes from beginning to end.
In weather news, it's CHILLY! We're having a wonderful fall and I hope it sticks around. The trees are beautiful and I am enjoying not having to use air conditioning or the heat. I'm also on fall break from classes - it's only a four day weekend, but every little bit helps :)
Thanks for taking a peek!

Saturday, October 16, 2010

Christmas Ornaments

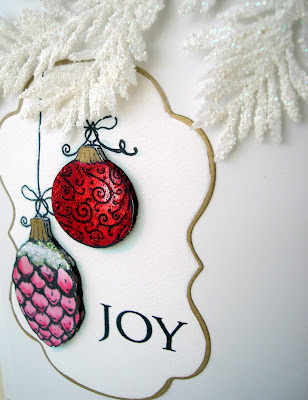
I love vintage style Christmas ornaments, especially this set from Flourishes - All That Glitters. Aren't those ornaments just beautifully detailed? It's so much fun coloring them in!

On this card, I used the lovely Spellbinders Labels Fourteen and I stamped the ornaments on top. I stamped separate ornaments on left over white cardstock so I could double layer them. I colored them pretty simply with Copic markers and glittered them with Stickles (Christmas Red) and some loose white glitter. I edged the label with a DecoColor Gold paint pen. The white sparkly branch is something I picked up at Hobby Lobby last season. I knew I wanted to stay with white, so it was perfect.
The "Joy" is from the Hero Arts clear set, Holiday Sayings and I stamped with Memento ink.
Thanks for taking a peek!

Thursday, October 14, 2010

Nontraditional Christmas Colors


I love the traditional colors and accents of Christmas. However, sometimes, change is good! On this card, I used a paper from the Winter Joy Collection from BoBunny. I love this collection - not only does it have beautiful colors, the patterns are also very nice.
As you can see, I'm still enjoying my new Spellbinders dies! I used the beautiful Lacey Circles on this card as well as last year's Limited Time Nested Christmas Trees set. I created the custom glittered paper myself before die cutting it with three different kinds of glitter. For the white part, I used a Martha Stewart Crafts Deco Fan border punch on both the top and bottom and then I embossed a line above each with my dry embossing stylus. The stamp was used with a Ranger Big and Juicy Rainbow Ink pad. I wanted to sort of mimic the way the colors melt together on the paper. The stamp is from a Clear Hero Arts set that I use constantly - Holiday Sayings.
Thanks for taking a peek, have a great weekend!

Tuesday, October 12, 2010

Pretty Peacock

When I was a kid, I lived on a farm. We had all sort of animals - including peacocks! My mom had a big vase full of peacock feathers she had gathered and some of the more mischievous kids (ok, me) would sneak up on the peacocks and snag a feather just for fun. I just loved the bright electric blue and green, they were SO PRETTY!

When my best friend, Dayna, was here a few weeks ago, we went to Hobby Lobby and I freaked out a little bit when I saw they had a set of Cuttlebug embossing folders with a peacock print! There was also a zebra, leopard and crock print in the set - very cool!

For this card:
1. I used a beautiful blue cardstock and embossed it.
2. Then I took Versamark ink and rubbed it over the embossing.
3. I brushed metallic green Perfect Pearls over the ink.
4. I embellished it with brown pearls for the "eye" of the feather.
5. I matted the blue onto metallic copper paper and then onto a green base. Before I adhered it to the green, I tied a ribbon around it.
6. Using a Spellbinders Label die, I cut the copper paper for the sentiment.
7. I used American Crafts Thickers (Dear Lizzy) for the "hi." The punched edge is from an EK Success punch


Thanks for taking a peacock...er...peek!!! ;)

Sunday, October 10, 2010

Warmest Wishes


Yeah, so I'm still on that winter card kick.
On this card, I used Cosmo Cricket paper. For the holly and berries, I just drew them freehand and colored them with Copics. I used Glossy Accents on the berries so they'd shine.
If you don't have a stamp, sometimes the easiest thing to do is just draw something. When the design is really simple, like with the holly and berries, it's easier than you might think!
Thanks for taking a peek :)


Wednesday, October 6, 2010

Fall

Fall is here! The weather has been so amazing, I am loving it. We don't tend to get a long fall here, sometimes it seems like it's hot right up until it snows! The last week and a half has been just great, and I hope it lasts!


The funny thing about all this fall business is that I just keep yearning to do winter cards! I look forward to snow and Christmas cards all year because they're my very favorite. So while I'm hoping that the fall weather sticks around, my creative mojo is making a snowman while listening to Christmas music.

This was made with Hero Arts stamps (clear and wood mounted). The snowman is part of a Build a Snowman set, and it is SO FUN! For the background, I used a wood mounted background stamp with Versamark ink. Then I brushed Perfect Pearls over the top - so in real life, the snowflakes are quite sparkly. To make the frame on the background paper, I simply used Copic markers and drew around it before machine stitching a straight edge.

Thanks for taking a peek :)

Saturday, October 2, 2010

Scrap 'n Art WCD Blog Train!

Welcome to the Scrap ‘n Art World Card Making Day Blog Train! If you haven’t been with us since the beginning of the train, make sure you go to Angela’s blog to board. Our train is headed on a fantastic holiday tour and you won’t want to miss any of the ten stops. We start out at Halloween, head on over to Thanksgiving and end our journey at Christmas. Each blog along the way has a word that you will need to write down. At the end of the line, post the sentence you gathered from the various blogs and you will be entered to win an amazing prize package!

The train ride will be open until midnight Sunday (US Central Time Zone) and the winner will be announced on the Scrap ‘n Art Blog on Monday, October 4.

This is the last of the Christmas part of the trip, and I have two cards for you. Both are pretty simple cards to make because the wide ribbon does most of the talking. I purchased this Ribbon Boutique ribbon in cream/gold and white/silver at Hobby Lobby.

On the first card, I used the Graphic45 Christmas Past collection (Deck the Halls and Ode to Joy). This collection is so beautiful and it has so many possibilities! I accented the image with Stickles and inked around all the papers with Ranger Distress Ink in Vintage Photo.

On the second card, I used damask paper from the Teresa Collins Chic Bebe Boy line. The doily is a simple baking doily from Martha steward Crafts. I love to use those on cards! The wreath and sentiment are from the Flourishes stamp set, Poinsettia and Boxwood. I accented the wreath with mini jingle bells that really do jingle! I attached them with Mini Adhesive Squares by Glue Arts. Thanks for taking a peek!

Welcome to the END of the line! Thank you so much for stopping by. My word for you is Girls! Compile the sentence from all the stops along the way and post it here on my blog. Thank you for sharing your journey with us!

Wednesday, September 29, 2010

Batty for Candy!

This Batty for Candy sticker from the BoBunny "Whoo-ligans" collection just makes me giggle! Not only is it adorable, but I made this card in about 4 minutes flat! When you have great colors and images, it's so fun and easy to make a quick card like this. Thanks for taking a peek!

Tuesday, September 28, 2010

World Cardmaking Day

Did you know that World Card Making Day is this Saturday - October 2? That's right! Make sure you drop by the Scrap 'n Art blog on Saturday so you can ride our blog train. We've got some great surprises in store!

In other news, I did make some cards this week for sharing...and as soon as I grabbed the camera to take pics, I realized the batteries were dead. Man! Best laid plans and all. I've been having a lot of fun playing with BoBunny's Halloween collection, "Whoo-ligans." It's so easy to work with, I just keep cranking out the cards!

So remember to go to the SNA blog on Saturday, you won't want to miss it. ;)

Monday, September 20, 2010

Spooky!

I love this photo - it's a picture of my mom, grandpa, grandma and uncle in the early 60's. I used the new BoBunny "Whoo-ligans" Halloween papers and the new Spellbinders "Nested Bats" and "Graveyard Scene and Shapes" for this layout along with the "Classic Lace Border Grand." Thanks for taking a peek!

Saturday, September 18, 2010

Fall Decor

I'm a regular shopper at my local Goodwill. Every once in a while, I will find something there that sets the wheels in motion for a project. About six months ago, I found a wooden apple. It had some words on it and it was a bit beat up, but I just loved the thick wooden shape and the leaves attached with heavy wire. I knew it belonged in my house! For only $0.75, I brought it home and went to work.

I used Liquid Laminate (Beacon Adhesives) to adhere the Nikki Sivils "Henry's Brilliance" lined paper to the apple. I cut it out in a bit of a rough shape - the apple itself didn't have smooth or even lines and I didn't want the paper to either. I used a black pen to outline the paper a bit.

After that, I found some cardboard letters and inked them with distress inks, letting the corrugation show though a bit. I adhered them with Zip Dry and figured I might as well add the pretty flower too :)

It was missing something, so I added some button "apples" to the bottom. I tied twine through some of them, but none of them are actually tied to the paper or anything. I just used "Adhesive Squares" by Glue Arts to adhere them.

I love it when I can create something for my home so inexpensively!

Friday, September 10, 2010

This week just ran away with me! Dd's birthday was today and her party is tomorrow. I've been busily getting the birthday craft ready as well as getting the Sunday School craft ready for the first Sunday School after summer break - WHEW!

Of course that is all on top of my full DT workload and college workload, but it's a good sort of busy right now :) It just means that I did not in fact get in my other blog post this week, arg. I do have a card to share for now, but I will try to upload the new version of it sometime this weekend. I didn't like how flimsy the bottom ended up being, so I added a light green layer that matches the light green of the patterned paper. I think it looks nicer too :) But in the meantime, here is the first version.
I just drew the pumpkin on light orange paper, making the bottom layer and then the top. I cut them out and sprayed them with Harvest Orange Glimmer Mist (I used a piece of chipboard as a mask). I inked them with brown ink and adhered the top layer with a foam dot. Pretty darn easy! The patterned paper is Graphic 45 and the letters are all by Nikki Sivils. Thanks for taking a peek!

Thursday, September 2, 2010

Fall Scrap 'n Art 2010 is HERE!!!


So did you see the new issue? Make sure you visit the SNA blog to see all the companies featured in this issue AND how you can win an awesome prize pack :)
Did you notice my blog posting slowed down just a tad? Well that is because college is back in session and I've been pretty busy. I will still be updating about twice a week as I can, so bear with me, folks!
Here is a recent card I made with the new Spellbinders Beaded Ovals. These beaded dies are SO pretty, definitely some of my favorites. If you're interested to see how I made the die pink and white, the tutorial and product info is on the Scrap 'n Art blog HERE. It's a super easy and fun technique!
As for everything else, it's fairly self-explanatory, but as always, if you have questions, just let me know.
Thanks for taking a peek ♥


Sunday, August 29, 2010

Little Girl

I love making feminine cards, especially for babies or little girls! My daughter also loves when I make these kinds of cards, but she would like it better if I gave them all to her. ;)


For this card, I used some of my new Spellbinder dies. I just love the new Nested Crown dies, aren't they lovely? This is the smallest of the crown dies and I used watercolor paper for all three die cuts because it's thick and embosses very nicely. The other two dies are Beaded Circles and Labels Sixteen. I inked over the embossing on the crown and circle dies and then I embellished the crown with Diamond Dust and Prima Marketing Pearls.

The sentiment is a Melissa Frances rub-on. To create the ruffle, I put down a line of adhesive and folded crepe paper over the top. After I had my first ruffle, I put another layer of adhesive over that and did the same thing again for an even rufflier ruffle, LOL ☺ Then I added a strip of pretty Lacy trim.
And here is the inside.
Thanks for taking a peek!